Apple’s latest Macbook series features the innovative M1 chip, which boasts impressive speed and extended battery life. Whether you’re tackling complex tasks or simply browsing the web, this new series of Macbook laptops is sure to exceed your expectations.
If you’re a developer using a Macbook Pro M1 with the Apple Silicon chip and want to build and run a React Native application, you may encounter some challenges. In this article, we’ll provide tips and strategies for overcoming these issues and successfully building and running your React Native app on an M1 Macbook Pro.
How to Set up, Build and Run a React Native App on Macbook Pro M1 Chip
Many developers are eager to upgrade to a MacBook with the M1 chip due to its impressive performance and battery life. However, it is worth noting that some applications may not yet be compatible with this new chip. While the MacBook Pro M1 offers numerous benefits, it is important for developers to consider this potential limitation when deciding whether to make the switch.
React Native is a popular JavaScript framework that enables developers to build native iOS and Android applications using a single source code. However, some developers have encountered issues when building React Native applications on a MacBook M1, particularly when it comes to running and testing the app.
If you’re a developer using a MacBook Pro or MacBook Air with the M1 chip and have experienced errors while building a React Native application, don’t worry – in this article, we’ll share some tips for troubleshooting and resolving these issues.
React Native Build Failed on Macbook Pro M1
If you’re using an M1 Macbook and have encountered an error when attempting to run ‘react-native run-ios,’ you’re not alone. Many developers have experienced this issue, and the error message that you may see when building a React Native iOS application on an M1 Macbook can be found below.
The following build commands failed:
CompileC /Users/[username]/Library/Developer/Xcode/DerivedData/reactNativeBoilerplate-atkaxzsfrfdlfocjvyvemwywinew/Build/Intermediates.noindex/Pods.build/Debug-iphonesimulator/Flipper-Folly.build/Object. Users/[username]/[folder-path]/ios/Pods/Flipper-Folly/folly/synchronization/DistributedMutex.cpp normal x86_64 c++ com.apple.compilers.llvm.clang.1_0.compiler
(1 failure)

The solution to Run and Build React Native on M1 Macbook Pro
If you’re struggling to build a React Native application on your M1 Macbook, the solution may lie in using Rosetta. But what exactly is Rosetta, and how can it help resolve build failures in React Native on M1 Macbooks? Let’s take a closer look.
Rosetta is a dynamic binary translator developed by Apple Inc. for macOS, an application compatibility layer between different instruction set architectures. It gives developers and consumers a transition period in which to update their application software to run on newer hardware, by “translating” it to run on the different architecture.
If you’re using an M1 or Apple silicon chip-powered MacBook Pro or MacBook Air, you may be prompted to install Rosetta in order to open certain apps. This can be a common occurrence for users of these newer Macbook models.
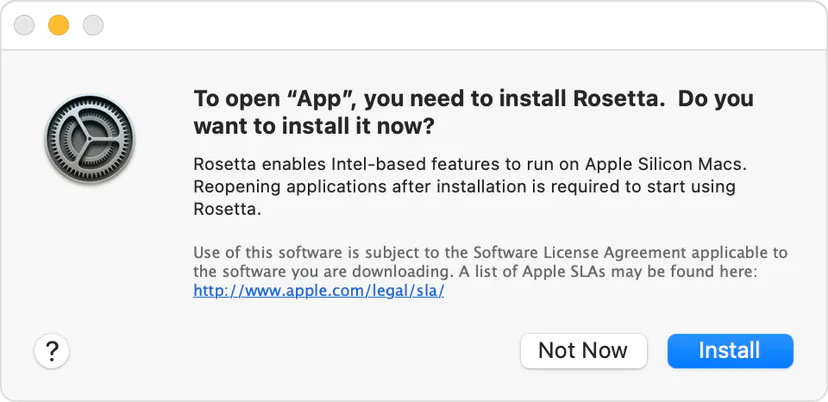
Set Terminal App to use Rosetta: To enable Rosetta for a specific app on an M1 or Apple silicon chip-powered MacBook, follow these steps:
1) Find the app in Finder and navigate to Applications/Utilities/Terminal (App terminals).
2) From the File menu in the menu bar, choose Get Info.
3) Check the box next to “Open Using Rosetta,” as shown in the image below.
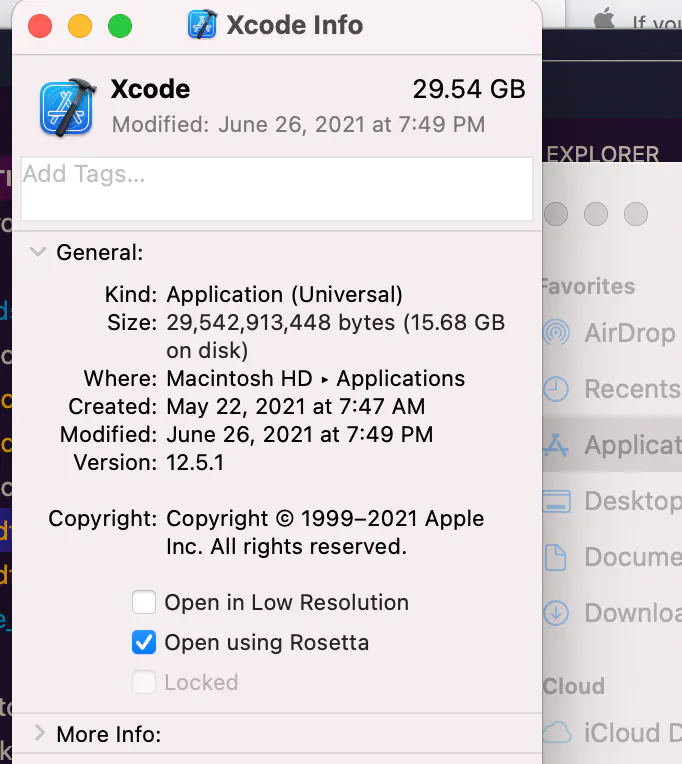
Set Xcode to use Rosetta: To enable Rosetta for the Xcode app on an M1 or Apple silicon chip-powered MacBook, follow these steps:
1) Find the Xcode app in Finder and navigate to Applications/Xcode (Xcode App).
2) From the File menu in the menu bar, choose Get Info.
3) Check the box next to “Open Using Rosetta.” This will allow you to use Xcode with Rosetta on your M1 or Apple silicon chip-powered MacBook.
- To ensure a successful and smooth build process, it may be necessary to delete certain folders. By removing these folders, you can help ensure that the build process goes smoothly and without any issues.
- delete the Pods/ folder in your-project-dir/ios/Pods
- delete podfile.lock in -> your-project-dir/ios/Podfile.lock
- If you’re using an older version of React Native or have encountered errors when building for iOS on an M1 MacBook, you can try the following steps to resolve these issues. However, if you have just recently initialized React Native on your M1 MacBook, you should be able to build and run your iOS app smoothly without any issues.
- The next step is to modify the Podfile in the iOS folder. your-project-dir/ios/Podfile. navigate to your react native project, and open it in the editor.
Find code below: ( your-project-dir/ios/Podfile )
use_flipper!()
And, replace with:
use_flipper!({ 'Flipper-Folly' => '2.5.3', 'Flipper' => '0.75.1', 'Flipper-RSocket' => '1.3.1' })
- The next step, install React native project as usual. Navigate to the root project directory, and run:
npx pod-install
- Next, run npx react-native run-ios from your terminal.
npx react-native run-ios

By following the steps outlined above, you should be able to smoothly run and build your React Native app on an iOS emulator. We hope that these tips are helpful and that you have a successful experience building your app. Good luck!.
Are you in need of a React-Native TypeScript boilerplate? If so, be sure to check out this resource for more information: https://github.com/handi-dev/react-native-typescript-boilerplate